Static charge is the buildup of charge on an object. In 1745, Ewald Georg von Kleist invented a tool to capture and store static charge. At approximately the same time, Pieter van Musschenbroek from Leiden, the Netherlands, invented a similar tool. This tool is called the Leyden jar. The Leyden jar provided early electrical experimenters with a way to store electrical charge and then move it to another place to use.
Leyden jars come in all shapes and sizes, but they all have the same design. The jar, which serves as the insulator, separates an inner conductive layer (or electrode) and an outer conductive layer (also an electrode). Examples of a conductive layer are aluminum foil and gold leaf. There is usually a metal rod with a ball on top placed in the mouth of the jar. The rod, or a chain connected to the rod, touches the inner conductor and is the conduit for electrical charge to the jar.
Figure 1. Inner workings of the Leyden jar. (HowStuffWorks.com, 2007.) |
The original Leyden jar held water as the inner conductor. Early electrical experimenters thought that the charge was held in the water. However, Benjamin Franklin was the first person to figure out that the charge in the Leyden jar is located where the insulator meets the electrode (in this case, the water). Thus, water is not required and can be replaced by attaching an electrode, such as aluminum foil, to the inside of the jar. Franklin also connected several Leyden jars together and created what he called a battery. This is not a battery like we know today, but it was a way to store lots of charge for Franklin's electrical experiments.
The Leyden jar is an interesting device because it is the precursor to the modern capacitor. A capacitor is an electrical component that is used to store charge, and along with the resistor and batteries (or voltage supply), forms the basis of all circuits. Both capacitors and batteries are similar in that they are components that store charge. The major difference between a battery and a capacitor is that a battery produces charge through a chemical reaction. A capacitor is much simpler as it can't produce charge, it can only store charge. Capacitors are used in timer circuits and logic circuits and a variety of applications. For example, the screen on the Apple® iPhoneTM is a capacitive touch screen.
In this science fair project, become Ben Franklin and build your own Leyden jar. You will also build an electrophorus. An electrophorus is a tool that is used for transferring charge to the Leyden jar. Try using small jars that you can find around the house. Experiment with how much charge your Leyden jar can hold. Remember that even a small jar can store a lot of charge, so be very careful or you can get a painful shock.
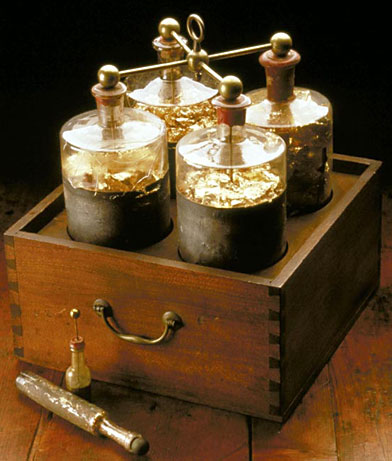
Figure 2. Leyden jar battery. (Bakken Library and Museum, n.d.)
Materials and Equipment
- Assembling the Electrophorus
- Disposable aluminum pie pan
- StyrofoamTM cup
- Tape, Scotch® (1 roll); do not use any other kind of tape.
- Assembling the Leyden Jar
- Small plastic jar with lid; a film canister, which is generally made with HDPE (high-density polyethylene) plastic, works very well
- Hammer
- Nail (a plain metallic nail that is slightly longer than the jar you are using)
- Small piece of aluminum foil
- Tape, Scotch® (1 roll); do not use any other kind of tape.
- Spoon
- Tap water
- Paper towel
- Charging the Electrophorus
- Acrylic sheet, 11" x 14"; available at hardware stores. The sheet should be larger than the pie pan. Acrylic sheets occasionally come with an adhesive piece of plastic stuck to it. This is to protect the surface of the acrylic. Before starting this science fair project, make sure to peel off and remove all adhesive coverings from the acrylic sheet.
- Wool cloth (sweater, socks, or wool felt)
- Assembled electrophorous
- A stable wood table or a stable table with a wood top. Make sure that the table is completely cleared off. Also, before starting, make sure that the table is completely washed and dried off.
- Measuring the Charge
- Small piece of an aluminum sheet (an aluminum cover for an electrical box works well, as in Figure 6 below); available at hardware stores
- Large, flat piece of Styrofoam
- Plastic travel soap dish (clamshell variety); the soap dish should be rectangular
- Scissors
- A piece of insulated wire, 6" long
- Wire strippers
- Tape, Scotch® (1 roll); do not use any other kind of tape.
- Metric ruler
- General
- Fine-tip pen
- Insulated tongs
- Lab notebook
- Graph paper
No comments:
Post a Comment